You have successfully created a blog and you have start to blogging. What’s next up? If someone visits your blog they want more valuable contents and your blog should be nice to see.
For this you have add a banner to your blog. OK, now you would like to add a banner on your blog, but you don't know where to start, how to add etc...Here we will show you how to do?
Here is the step by step tutorial on how to add a banner on your blog.
1) First login and go to your blog dashboard.
For this you have add a banner to your blog. OK, now you would like to add a banner on your blog, but you don't know where to start, how to add etc...Here we will show you how to do?
Here is the step by step tutorial on how to add a banner on your blog.
1) First login and go to your blog dashboard.
2) Go to DESIGN ---> page Elements
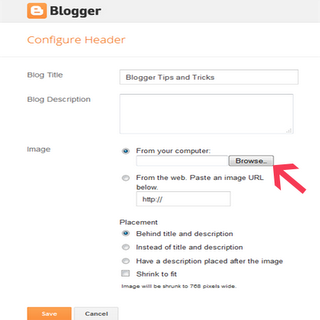
4) Click Browse, and find your banner that you saved on your computer.

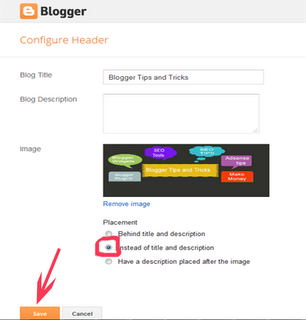
5) After saved the banner there is ‘Placement’ text is available, and there choose ‘Instead of title and description' then click 'Save'.

Now you can see the Banner image in your blog. This is the simple 5 steps to add your banner in your blog. It’s easy to understand you because we given with screenshots.
I hope this article is very useful for you. If you feel this is better for you please post your comments. We are always welcome to your opinions.
Read more:
3) On you’re 'page Elements’ page click on 'Edit' text to your header (marked).
4) Click Browse, and find your banner that you saved on your computer.

5) After saved the banner there is ‘Placement’ text is available, and there choose ‘Instead of title and description' then click 'Save'.

Now you can see the Banner image in your blog. This is the simple 5 steps to add your banner in your blog. It’s easy to understand you because we given with screenshots.
I hope this article is very useful for you. If you feel this is better for you please post your comments. We are always welcome to your opinions.
Read more:


0 comments:
Post a Comment